Yarn – acrylic, ½ - ¾ skein of each color
Colors – neon orange, green
Crochet hook – size 5 or 6
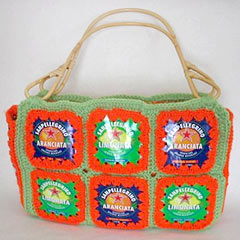
10 cans (I used San Pellegrino soda, which can be found in the “imported foods” section of your grocery store)
Bamboo bag handle (or whatever you prefer)
*Slip Stitch (SS) - (put hook through existing stitch, YO, pull through stitch and loop on hook)
Optional lining:
About a yard of fabric
Enough plastic canvas to cut 3 pieces to fit front, back, and bottom of bag
Sewing needle and thread
Prepare cans:
Panel A = 12 - front and back panels measuring 3½” square.
Panel B = 3 - 2½” x 8” panels for the sides and bottom (longer if you can, this seems to be about as much as you can get from a can)
Panel C = 2 – 2½” x 1½” pieces (or however wide you need) to extend the bottom piece so it’s long enough to cover the bottom of the bag. You should probably wait until you need them to cut them, measurement may vary. (Be sure to take the crochet around the edges into account when measuring.)
-Punch holes and DC around all panels with orange and bind off, weaving in ends.
-SS around each Panel A with green. (Optional for other pieces)
Front and Back pieces – Make 2:
-With wrong side facing, SC 6-Panel A pieces together using green yarn. (or you can just seam using tapestry needle. The SC puts an extra 1⁄4” or less between each panel and looks kind of cool)
-DC around each completed front and back section with green.
Because your can panels may not be exactly the same height, and will probably be curved at the corners, there will be a dip where each panel connects. To even it out a bit when you’re DC-ing around the front and back pieces, use a Triple Crochet where you need a longer stitch. It’ll still be a little wavy, but wavy is pretty, right?
Finishing:
Seam sides (2-Panel B) to front and back pieces with tapestry needle, through back loops.
Seam bottom pieces (1-Panel B and 2-Panel C on either side of it) together lengthwise, then seam to front, back, and side pieces. If the bottom piece doesn’t span the bottom of the bag, add rows of crochet until it fits.
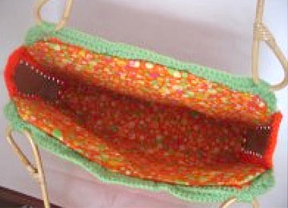
Lining:
OK, now this is cool. I learned this trick from Marnie MacLean (http://marniemaclean.com/words/words.html) and it’s the best. OK, cut the plastic canvas pieces to the size of the front, back, and bottom of your bag. I cut two for the bottom and sewed then together to make it a little sturdier. You’ll probably have to round off the edges and trim here and there to make sure the lining comes at least 1⁄2” below the top of the bag. Trim until the plastic canvas fits in snugly, but not so much that it bends.
Now, lay all three pieces end to end on a piece of fabric with the right side up and place another over it right side down. Sew around the pieces so they’re inside a snug-fitting little bag. Leave enough unsewed so you can get the pieces out, turn it right-side-out, put the pieces back in and sew it shut! It’s ok if they move around in there. Once it’s sewn shut, make sure the bottom piece is between the two larger pieces. Place it in the bag so the middle folds into the bottom of the bag and tack it in there around the top edges with needle and thread. So. Cool!
Handle:
Just kind of sew it on there however you think it looks good. I used green yarn and sewed it just above the lining. I really wanted a clear acrylic handle, but they only had a bamboo one at the craft store.
And now you’re ready to show the world what recycling really means!